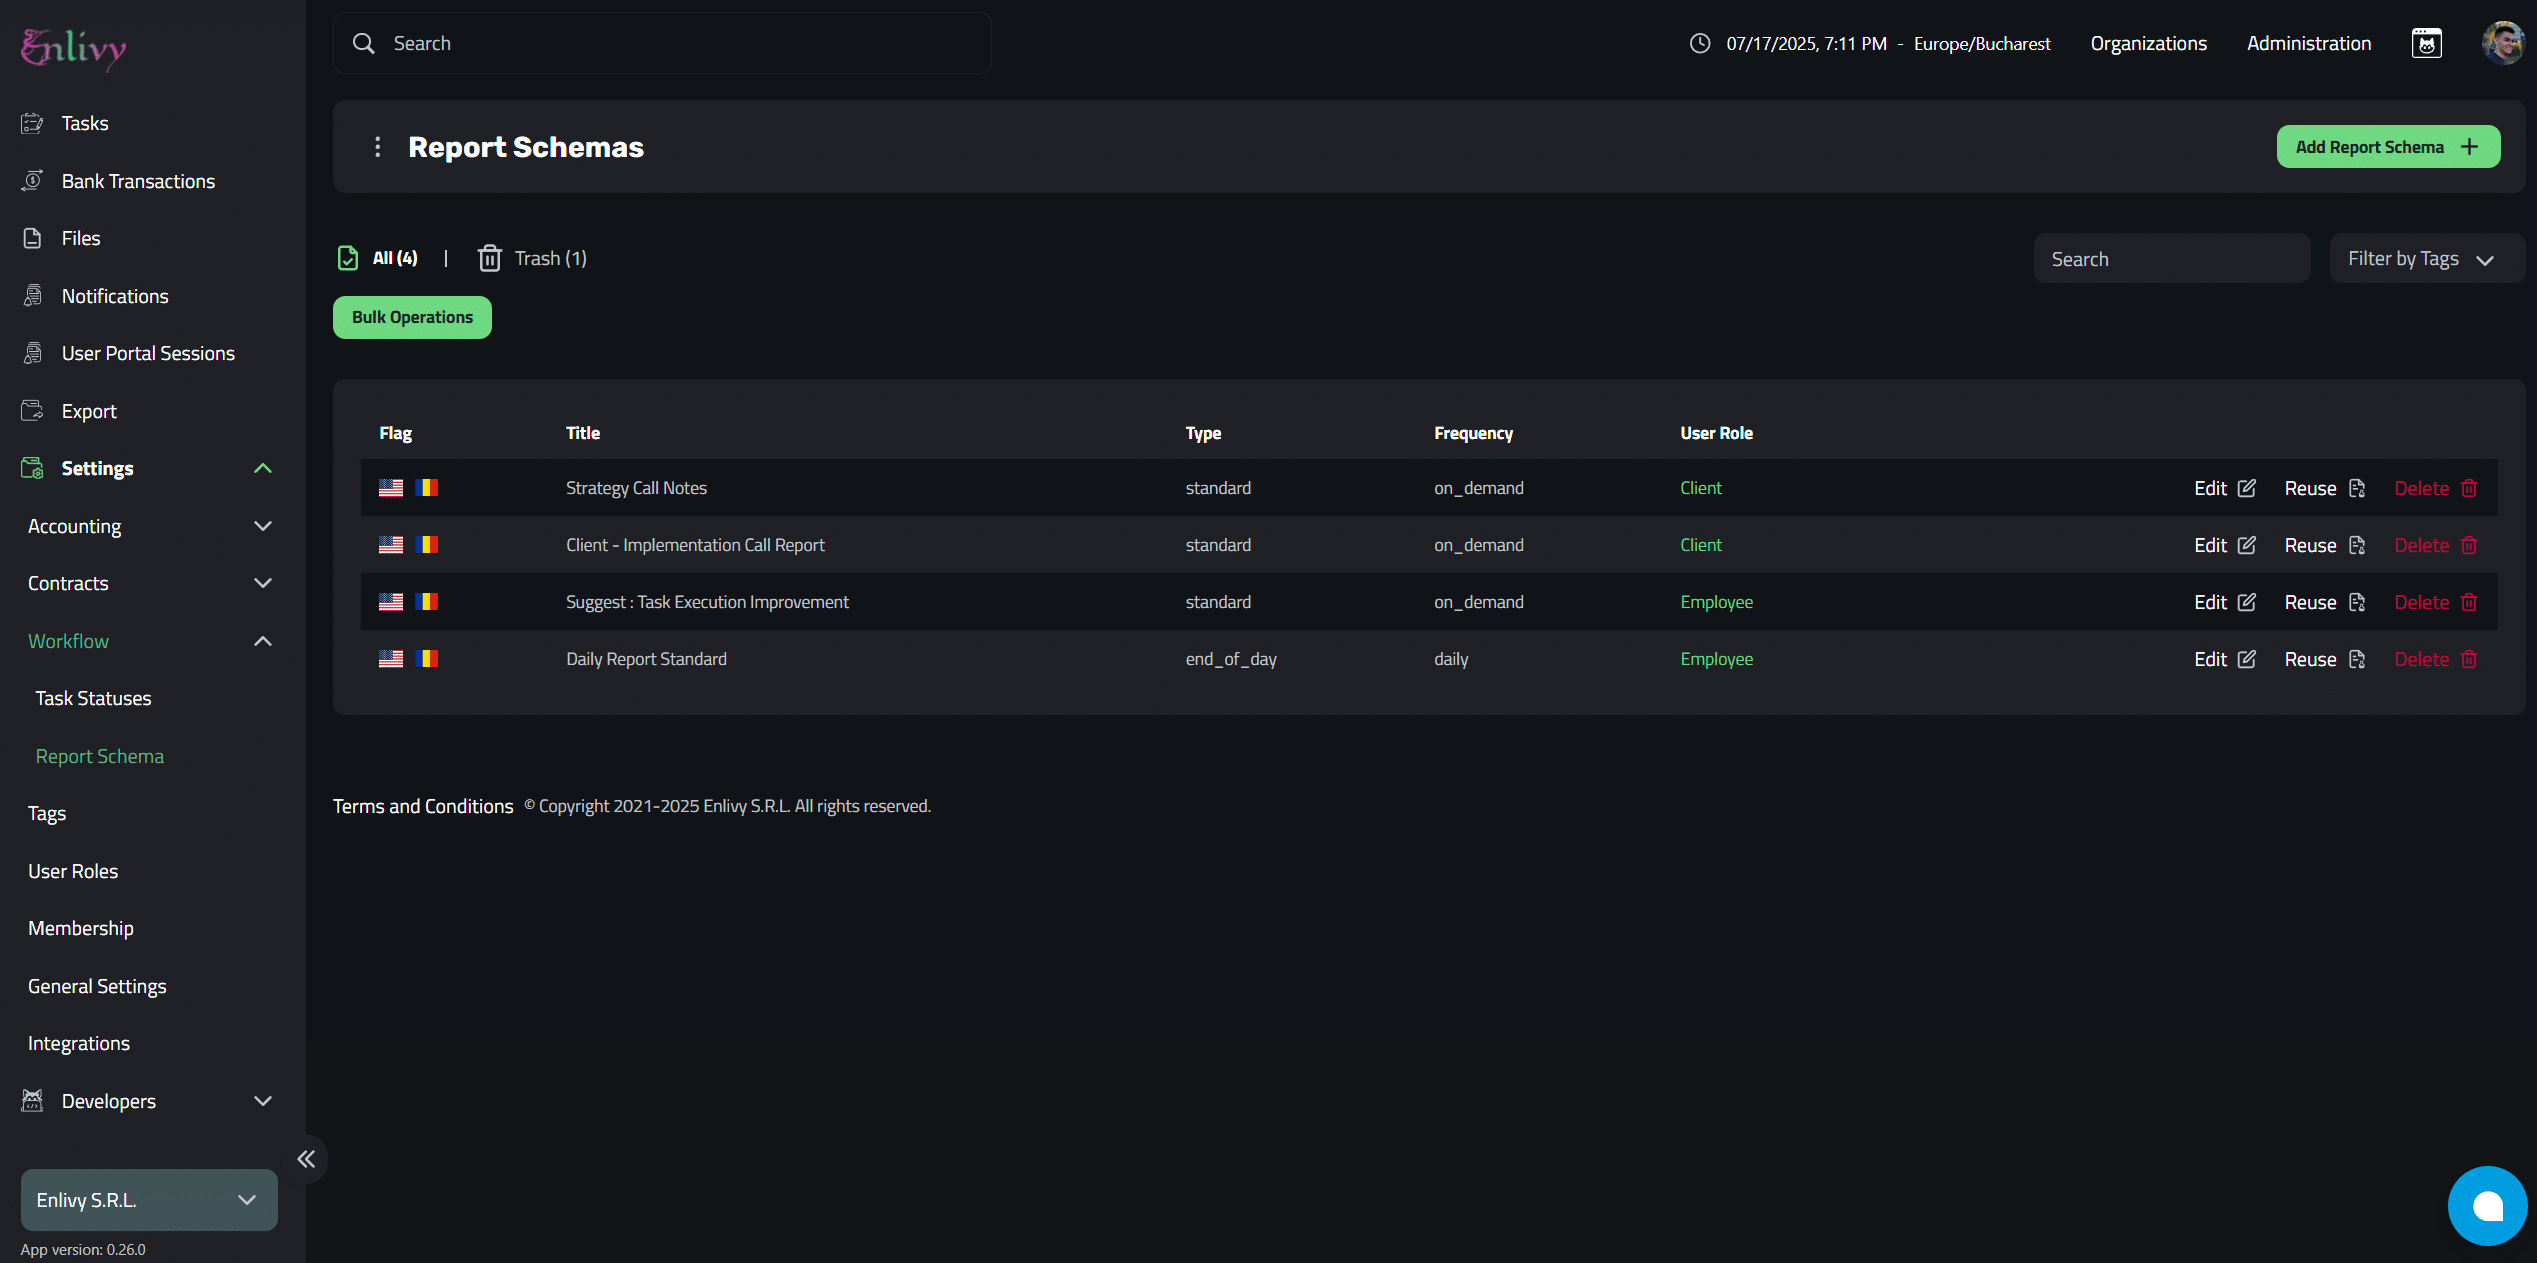
Reports Schemas
A Report Schema in Enlivy is a flexible reporting template that allows you to design exactly how a report should look and behave.
Instead of manually asking users for updates, you create a schema (blueprint) that defines:
- What questions or fields should appear in a report
- For example, you might ask about daily progress, project blockers, or time worked.
- Who should fill out the report
- You can assign it to specific user roles, so only relevant people see it.
- When and how often the report should be completed
- Daily, weekly, monthly, or on-demand.
- How the responses should be structured
- Each field can have its own format: text answers, ratings, timesheets, checkboxes, etc.
Think of a Report Schema as the template behind every report. Once you set it up, Enlivy takes care of the rest, users will see it in their Reports section and complete it according to your predefined settings.
This helps you collect structured, consistent information without the need for back-and-forth messages, emails, or spreadsheets.
What’s the Difference Between a Schema and a Report?
In Enlivy, a Report Schema is the backbone of a report. It’s the template or structure that defines how a report looks and what it contains. The schema decides:
- Which fields or questions will appear (e.g., text, radio buttons, timesheets)
- Who should fill it out (based on user roles)
- How often it should be completed (daily, weekly, on-demand)
A Report, on the other hand, is a real, filled-out instance of that schema. Once you create a schema, Enlivy generates reports based on it, and users complete those reports with their answers.
Example:
- You create a Daily Work Summary Schema → it contains fields like “What did you work on today?” and “How complex was your work?”
- Then, users can fill-up the Report entitled Daily Work Summary – with their own unique information.
Why Use Report Schemas?
Without a clear reporting structure, updates can quickly become messy and inconsistent. Some users might send long, unorganized notes, while others may forget to provide updates altogether. Important information gets lost in endless chat threads or scattered emails.
Report Schemas solve this problem by creating a standardized, predictable way of collecting updates.
Here’s why they’re valuable:
- Ensure consistent reporting
Everyone answers the same questions in the same format, making reports easy to read, compare, and analyze. - Save time and reduce back-and-forth
Instead of repeatedly asking for updates, you simply define the schema once. Users know exactly what to fill in, and you get structured responses without chasing people. - Get cleaner, more useful data
Because fields are predefined—like radio buttons, timesheets, or text areas, the data collected is always organized and ready for review. - Simplify recurring reporting
Whether you need daily check-ins, weekly summaries, or periodic project updates, schemas make it easy to keep a consistent reporting rhythm without confusion.
Elements of a Report Schema
A Report Schema consists of several key elements that shape how the report appears and functions. Apart from general settings like title, description, and frequency, the core of any schema lies in its fields, the individual questions or data points that users complete when submitting a report.
Each field can be customized with:
- Title: The question or label displayed to the user
- Description: Additional context or explanation about the field
- Instructions: Guidance on how to accurately fill out the field
Fields can be of various types, including:
- Radio buttons (for multiple-choice questions)
- Text areas (for open-ended responses)
- Timesheets (to track hours worked)
- Checkboxes
- Date pickers, and more
You can also:
- Mark fields as required to ensure essential information is always provided
- Apply conditional logic, so some fields only appear based on users’ previous answers
Creating a Report Schema in Enlivy
Step 1: Creating a New Report Schema
Navigate to the Report Schema Section
On the left side menu in Enlivy:
- Click Settings
- Select Workflow
- Click on Report Schema
- Then, click Add Report Schema
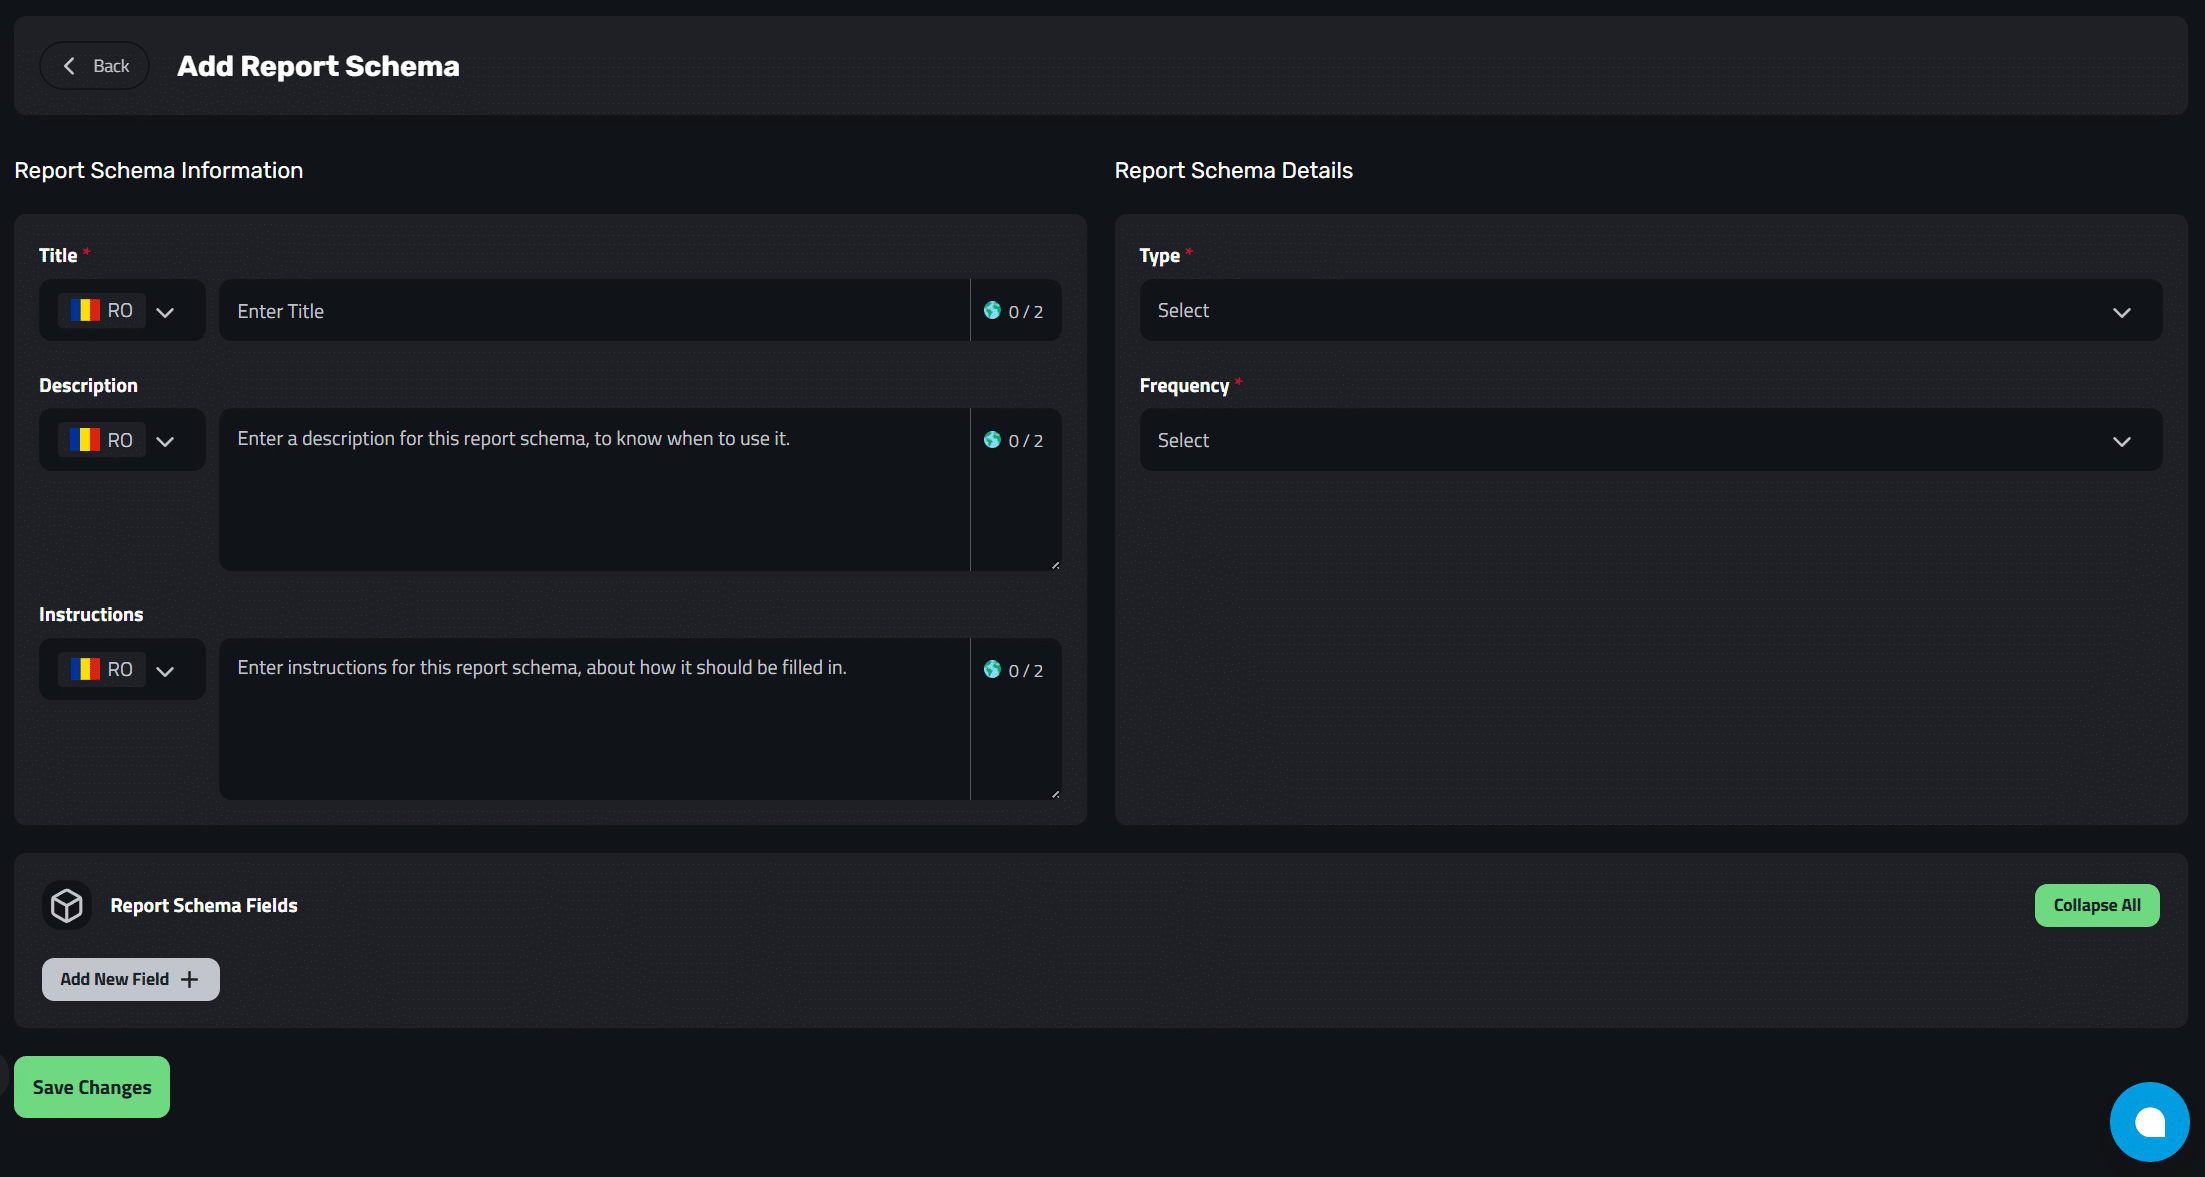
Fill in Report Schema Information
In the new Report Schema form, enter the following details:
- Title:
The name of the report schema. This should clearly describe the report’s purpose.
Example: Daily Report Standard - Description:
A brief explanation of what this report is for and how it should be used.
Example: This report must be completed daily by users to summarize their work. - Instructions:
Provide any important instructions or guidelines on how to fill out this report schema.
Example: Please fill this report honestly and submit it before the end of the day.
Set Report Schema Details
Configure the general settings that define how the report schema works:
- Type:
Choose the report type from the dropdown options:- End of Day
- Standard
- Standup
- Frequency:
Select how often this report should be filled out by users:- Daily
- On Demand
- Weekly
- (Other options available in dropdown)
Step 2: Adding Report Schema Fields
Once you’ve created the basic details of your Report Schema, the next step is to define the fields, these are the actual questions or inputs that users will see and complete when filling out the report.
To start, click ‘Add New Field’. You can create as many fields as needed, each tailored to the information you want to collect.
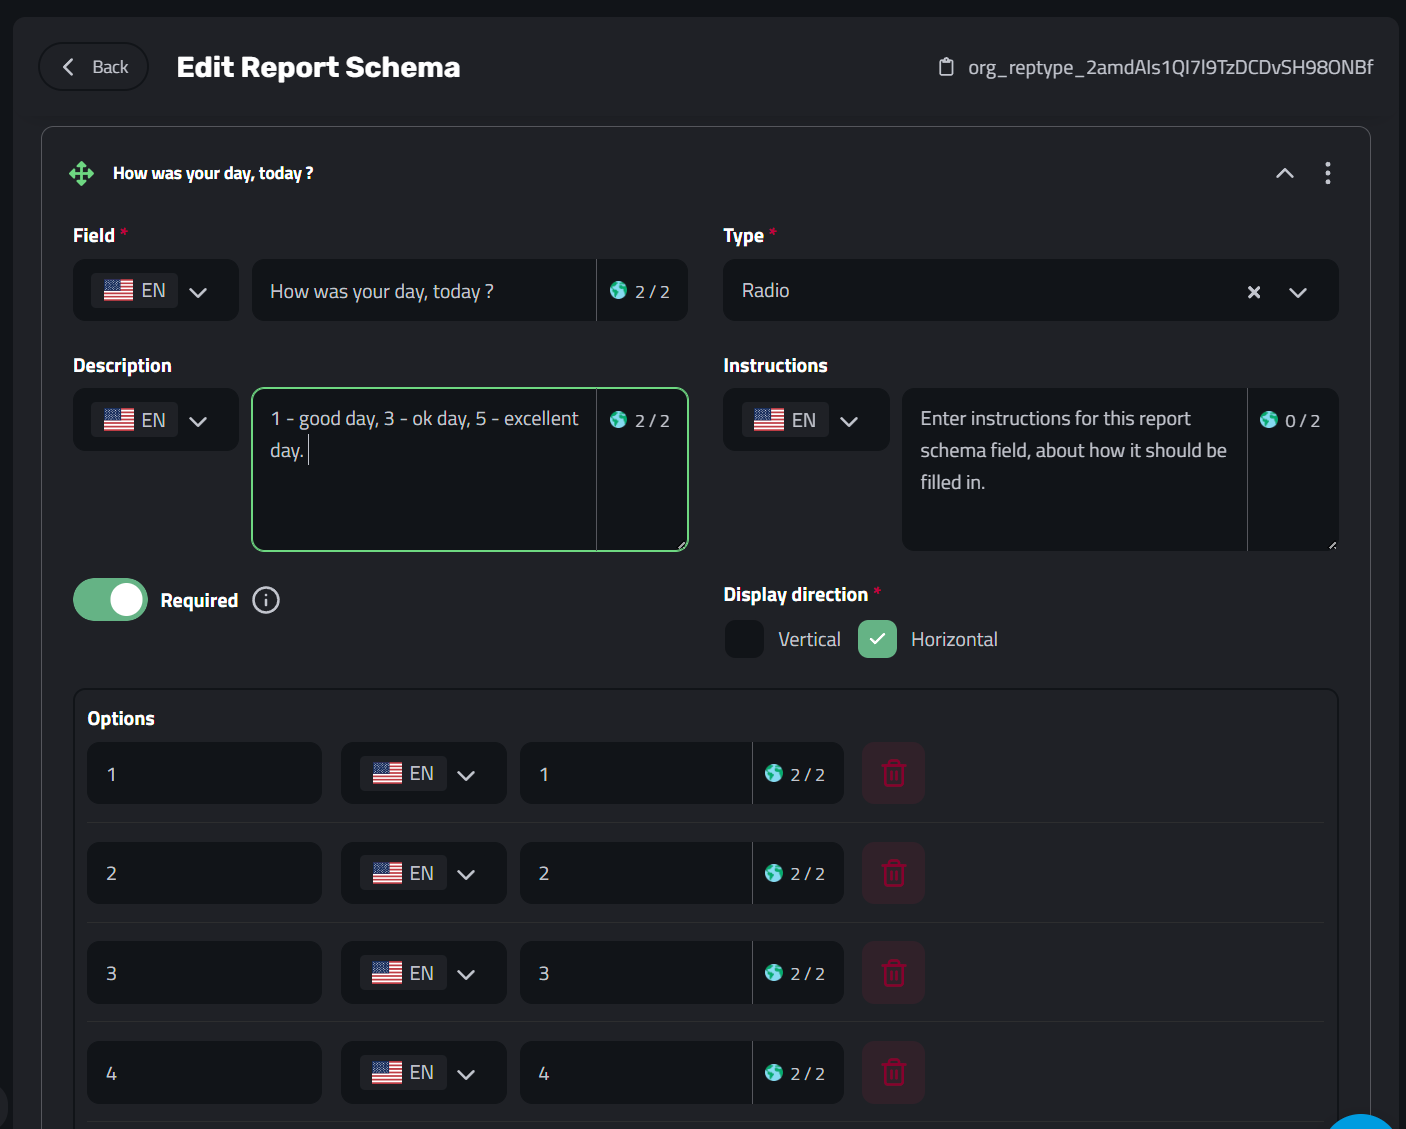
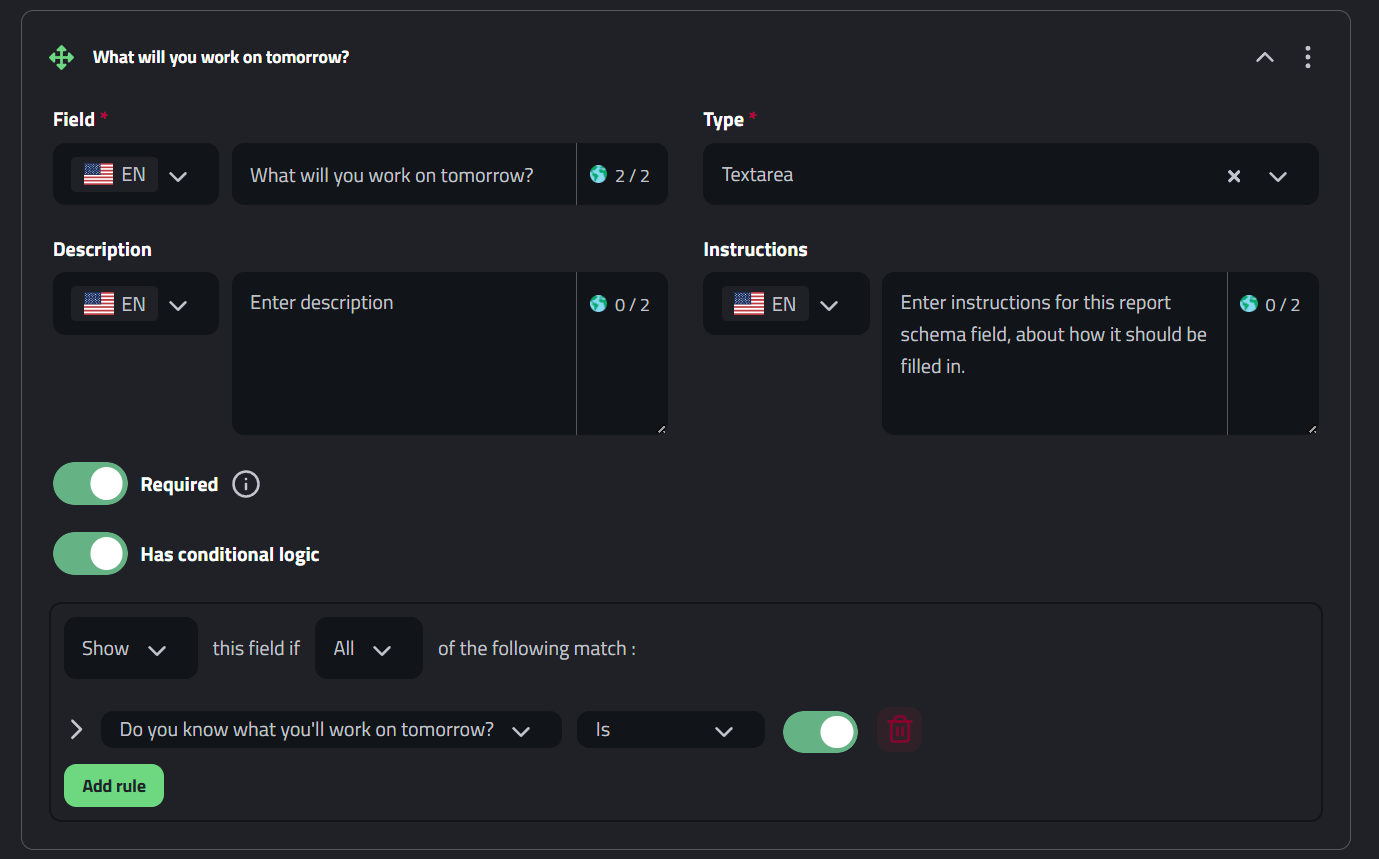
What Makes Up a Field?
When adding a new field, you’ll configure several options:
- Field Title
- The main question or label (e.g., “How was your day?”).
- Description
- Extra context for users (e.g., “1 = bad day, 3 = okay, 5 = excellent”).
- Instructions
- Clear guidance on how to complete the field (e.g., “Select one option that best describes your day”).
- Type (determines how the user will provide an answer).
- Is Required
- Display Direction
- Horizontal (options appear in a row)
- Vertical (options appear in a column)
- Options (if applicable)
- For fields like Radio Buttons or Checkboxes, you’ll define the available options.
- Each option has a key (e.g.,
1) and a value (e.g.,Excellent). - Example:
1 – Very Poor2 – Poor3 – Average4 – Good5 – Excellent
- Conditional Logic
- If enabled, this field will only appear when certain conditions are met, based on the user’s previous answers.
- Example: If the users selects “Yes” for “Do you know what you’ll work on tomorrow?”, then an extra field appears asking for details.
All Field Types Explained
| Field Type | What It Does | When to Use It |
|---|---|---|
| Text | A short single-line input. | For simple answers like “Project name” or “Client ID”. |
| Textarea | A larger multi-line text box for longer responses. | For detailed answers like “What did you work on today?”. |
| Checkbox | Allows users to select multiple options from a predefined list. | For “What tools did you use today?” where more than one answer is possible. |
| Radio | Lets users select only one option from a predefined list. | For ratings or single-choice questions like “How was your day?”. |
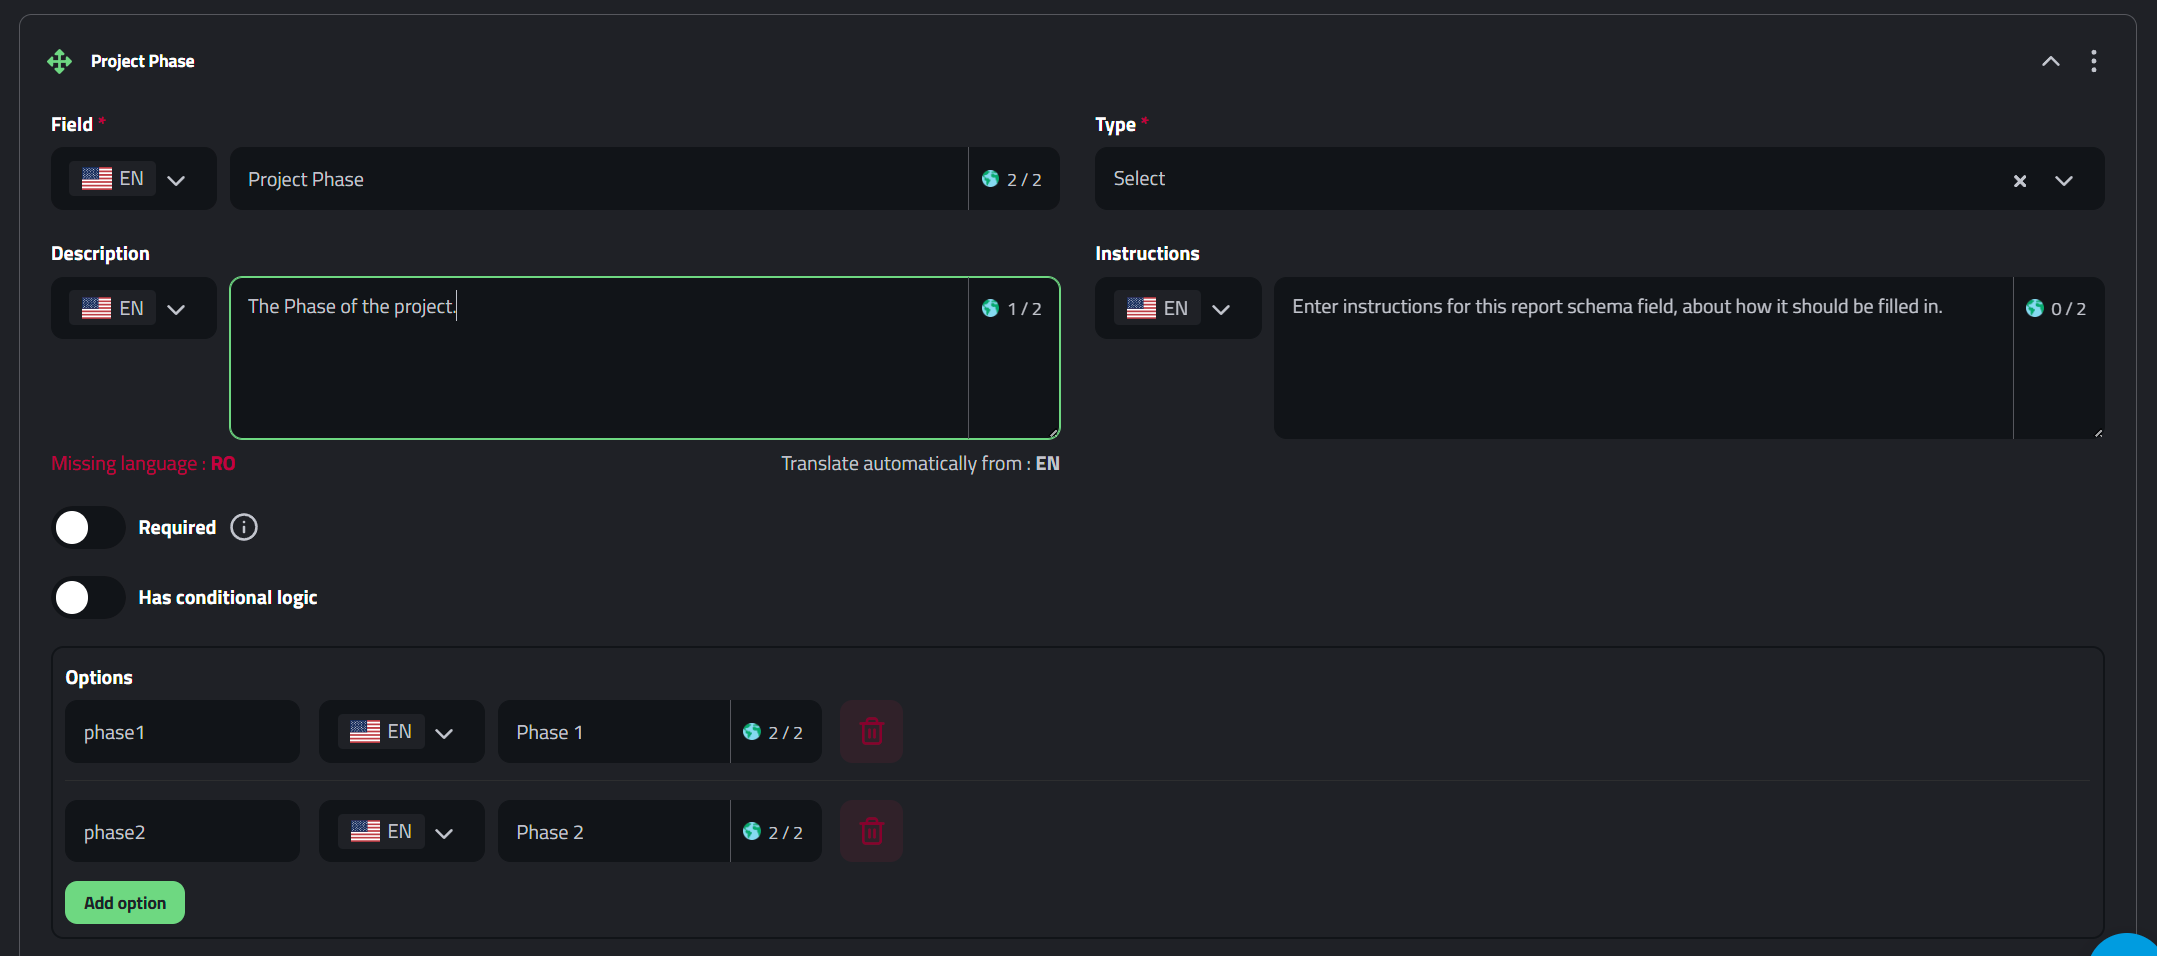
| Select (Dropdown) | A dropdown menu where users pick one option from a list. | For selecting predefined categories like “Department” or “Project phase”. |
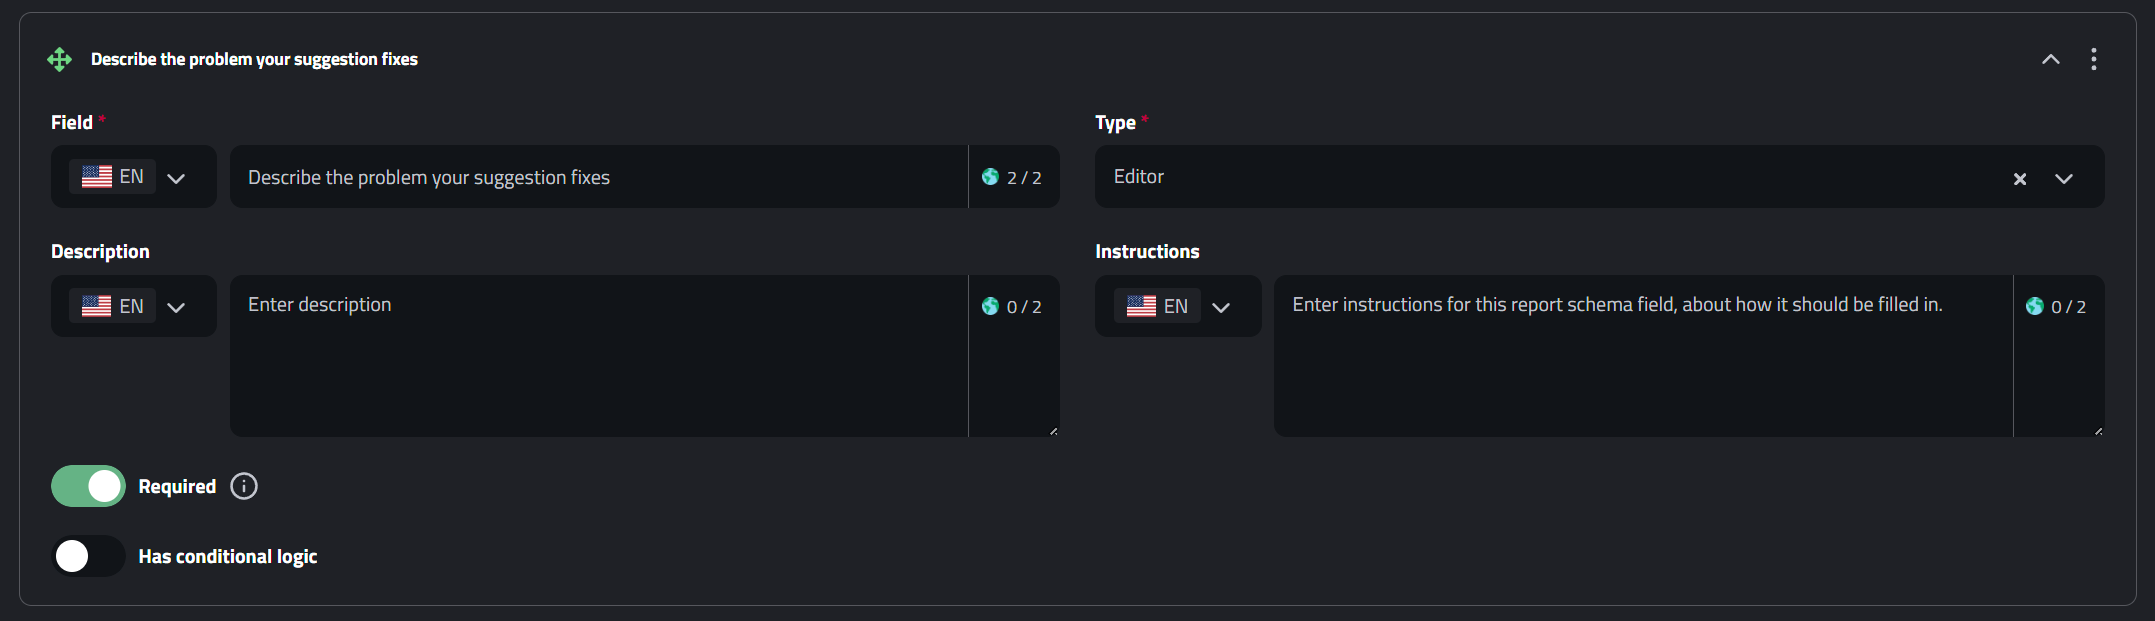
| Editor | A rich text editor (with formatting like bold, lists, links). | For structured reports that need formatted text, e.g., weekly summaries. |
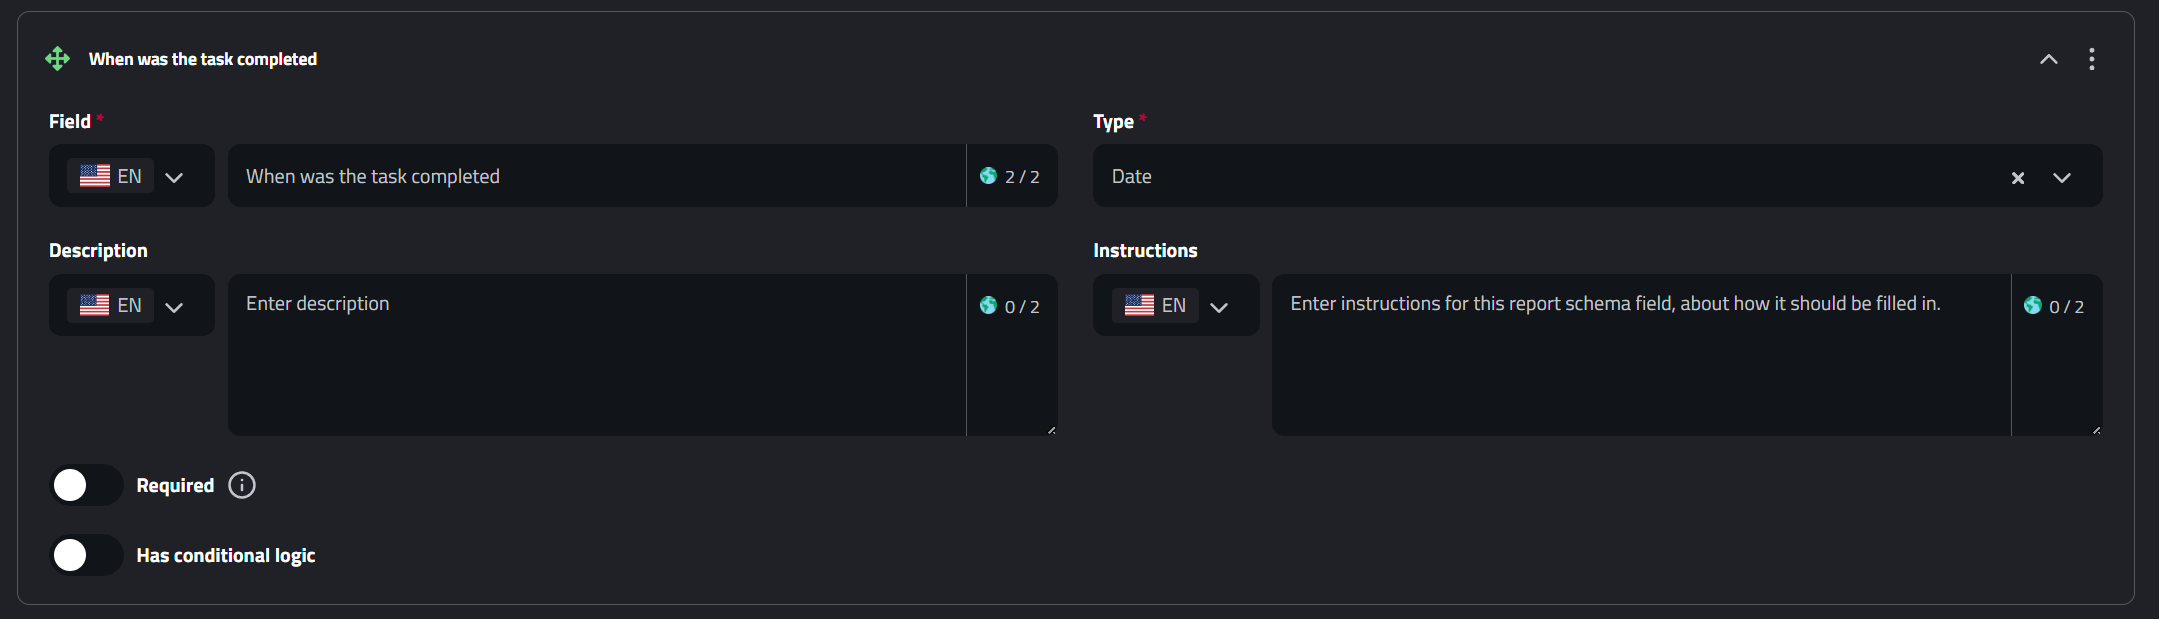
| Date | A simple date picker. | For selecting a specific date, like “When was this task completed?”. |
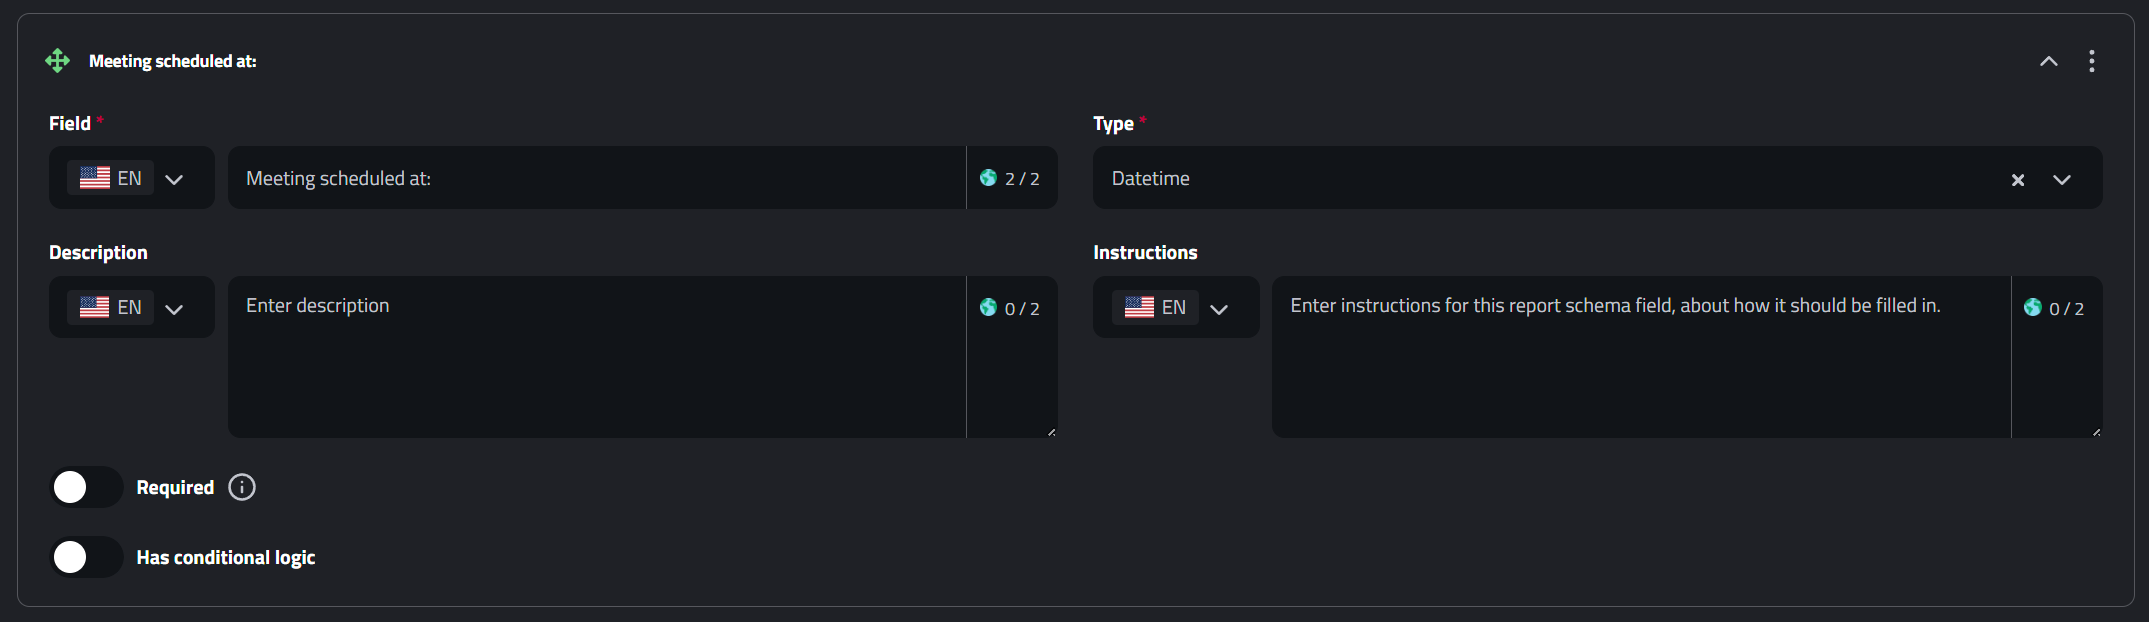
| Datetime | Date + time picker combined. | For logging exact timestamps, like “Meeting scheduled at…”. |
| Number | A plain number field. | For simple numeric inputs like “How many tasks did you complete?”. |
| Timesheet | Lets users log worked hours in a structured format. | For tracking work hours within a report. |
| Timesheet with Text | Same as Timesheet but allows adding extra text notes for each entry. | For logging hours + context, e.g., “3h – Bug fixing, 2h – Client meeting”. |
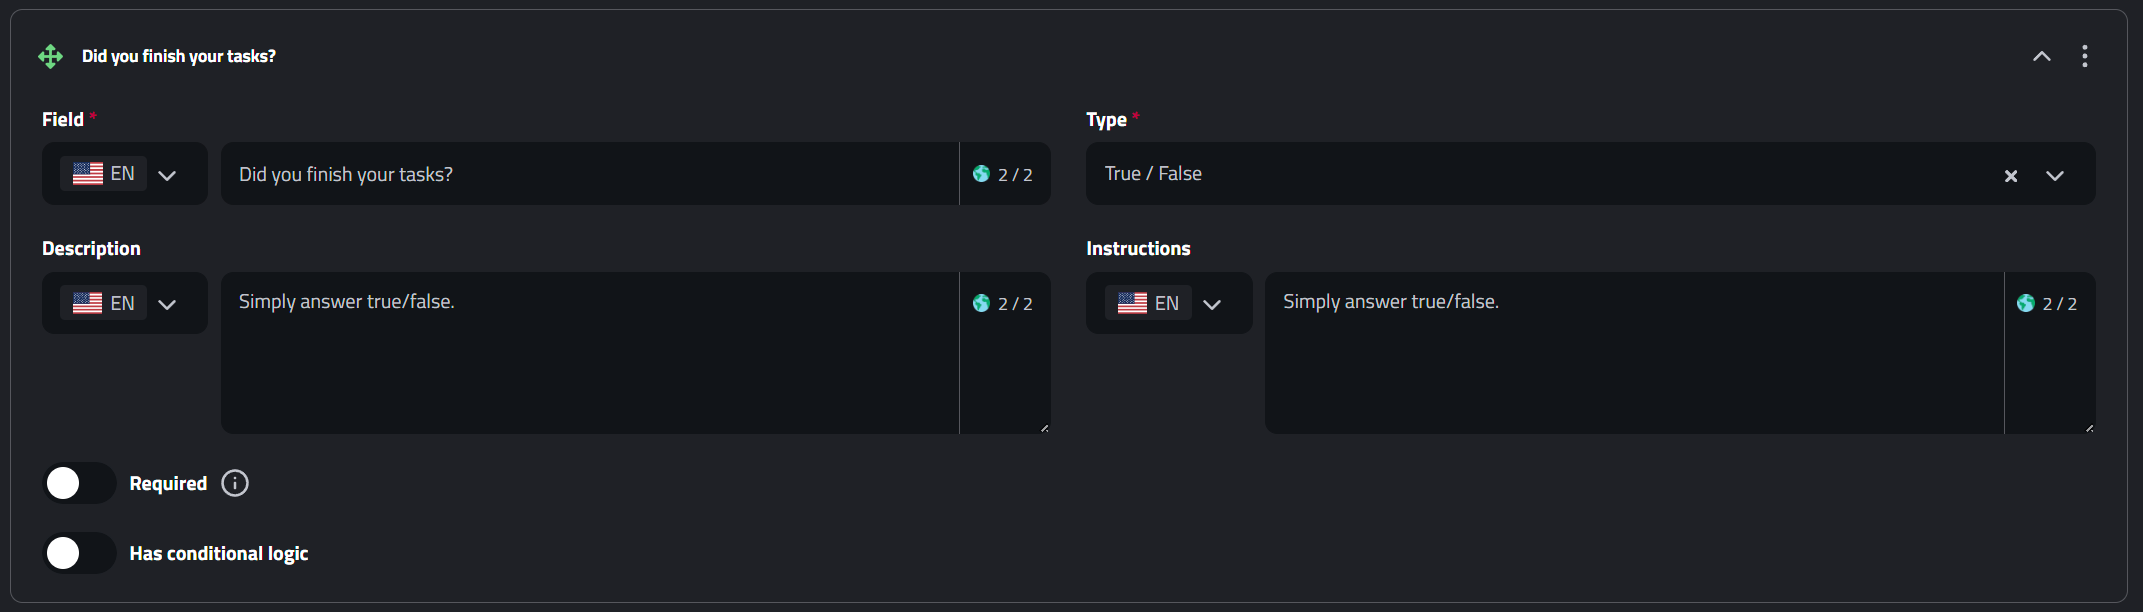
| True/False | A yes/no toggle (boolean field). | For simple confirmation questions like “Did you finish your tasks?”. |
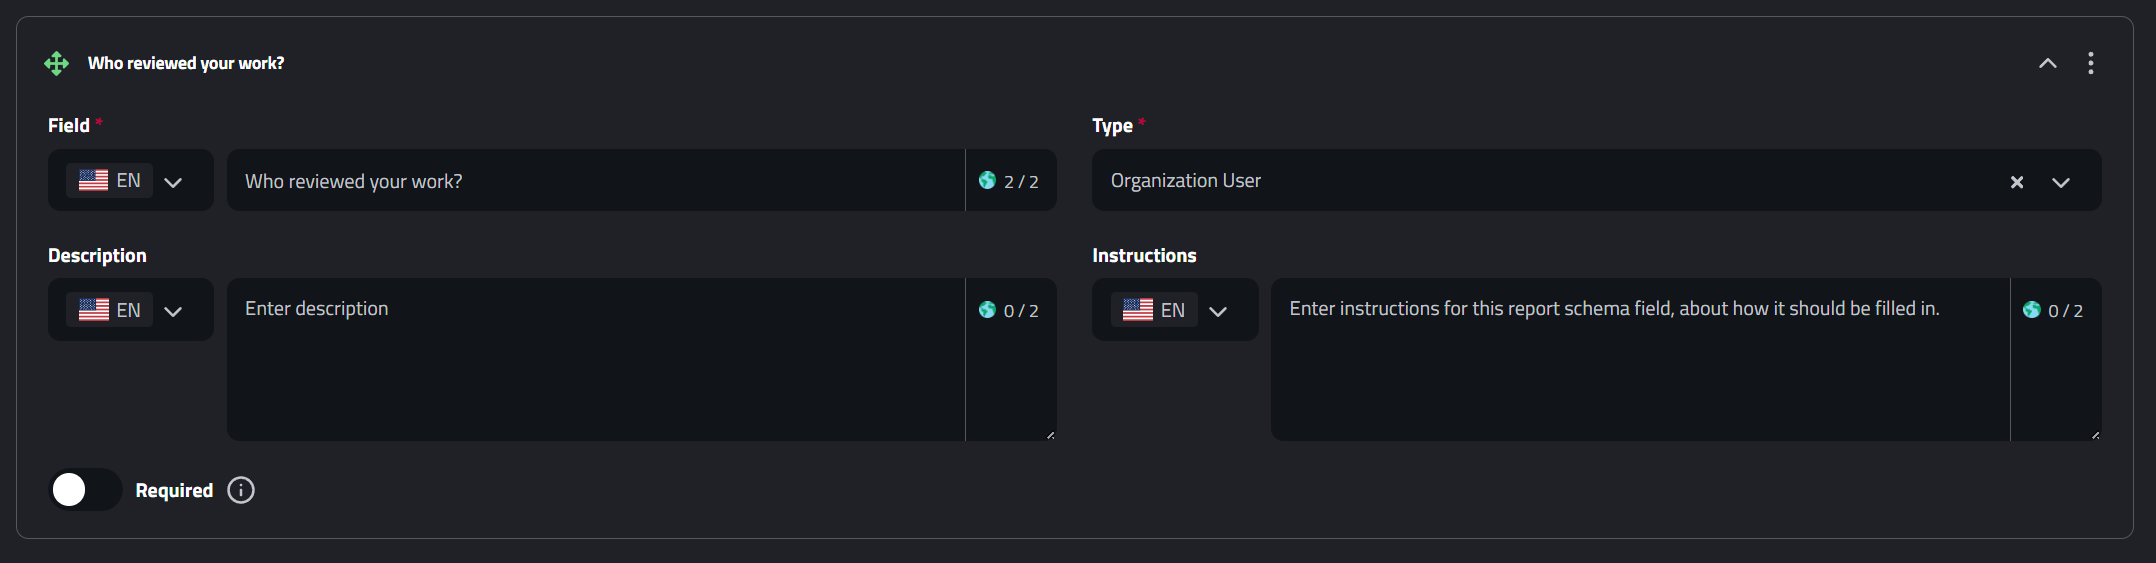
| Organization User | Lets users select another user from your organization. | For reports that need referencing a person, e.g., “Who reviewed your work?”. |
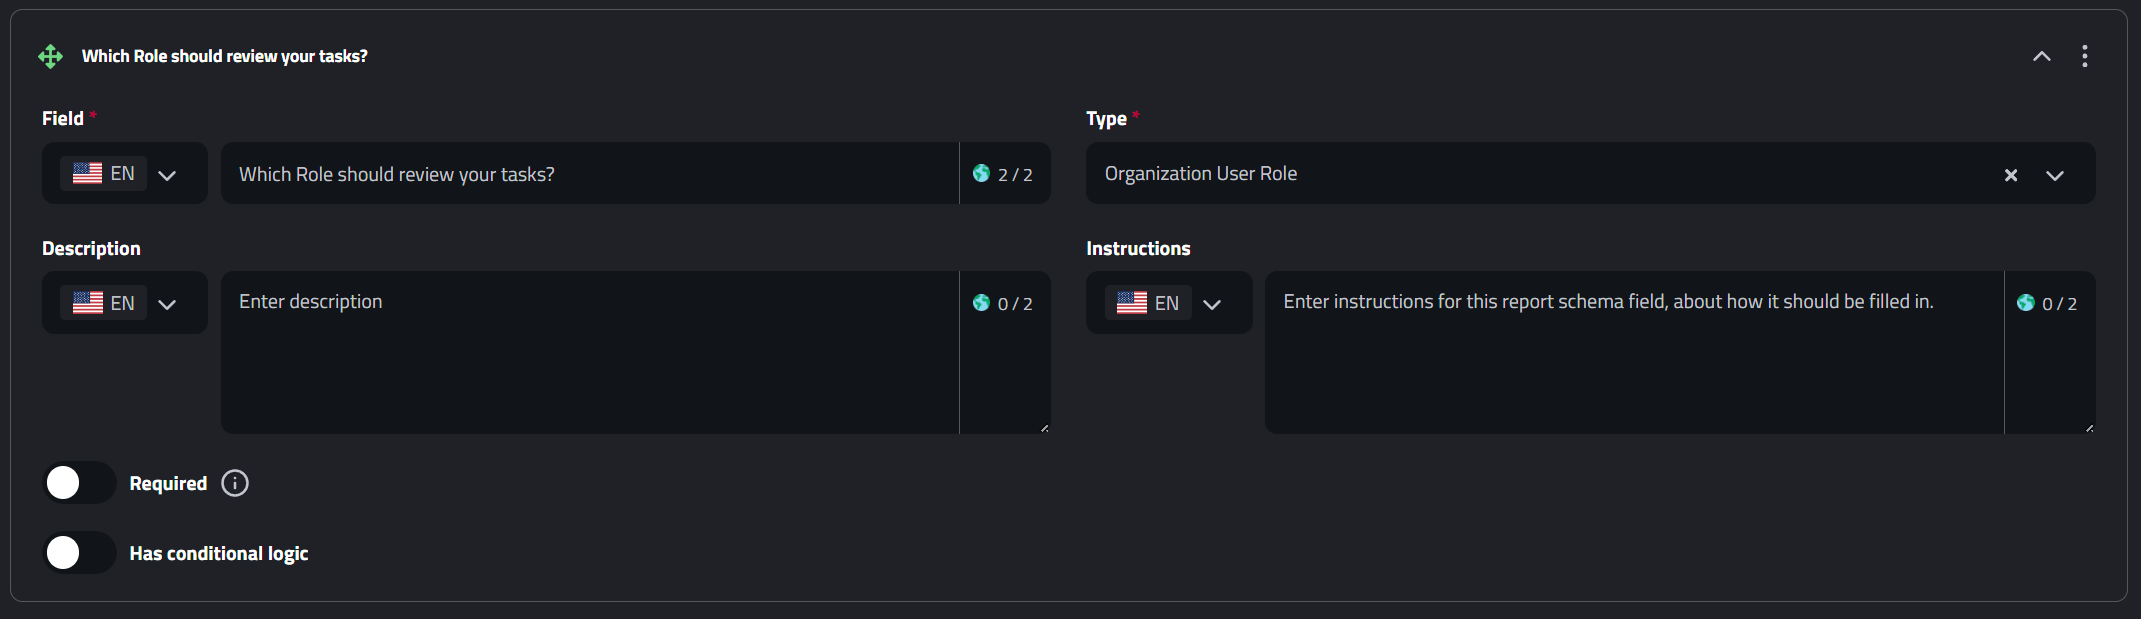
| Organization User Role | Lets users select a role within your organization. | For assigning or reporting based on roles, like “Which role should review this?”. |
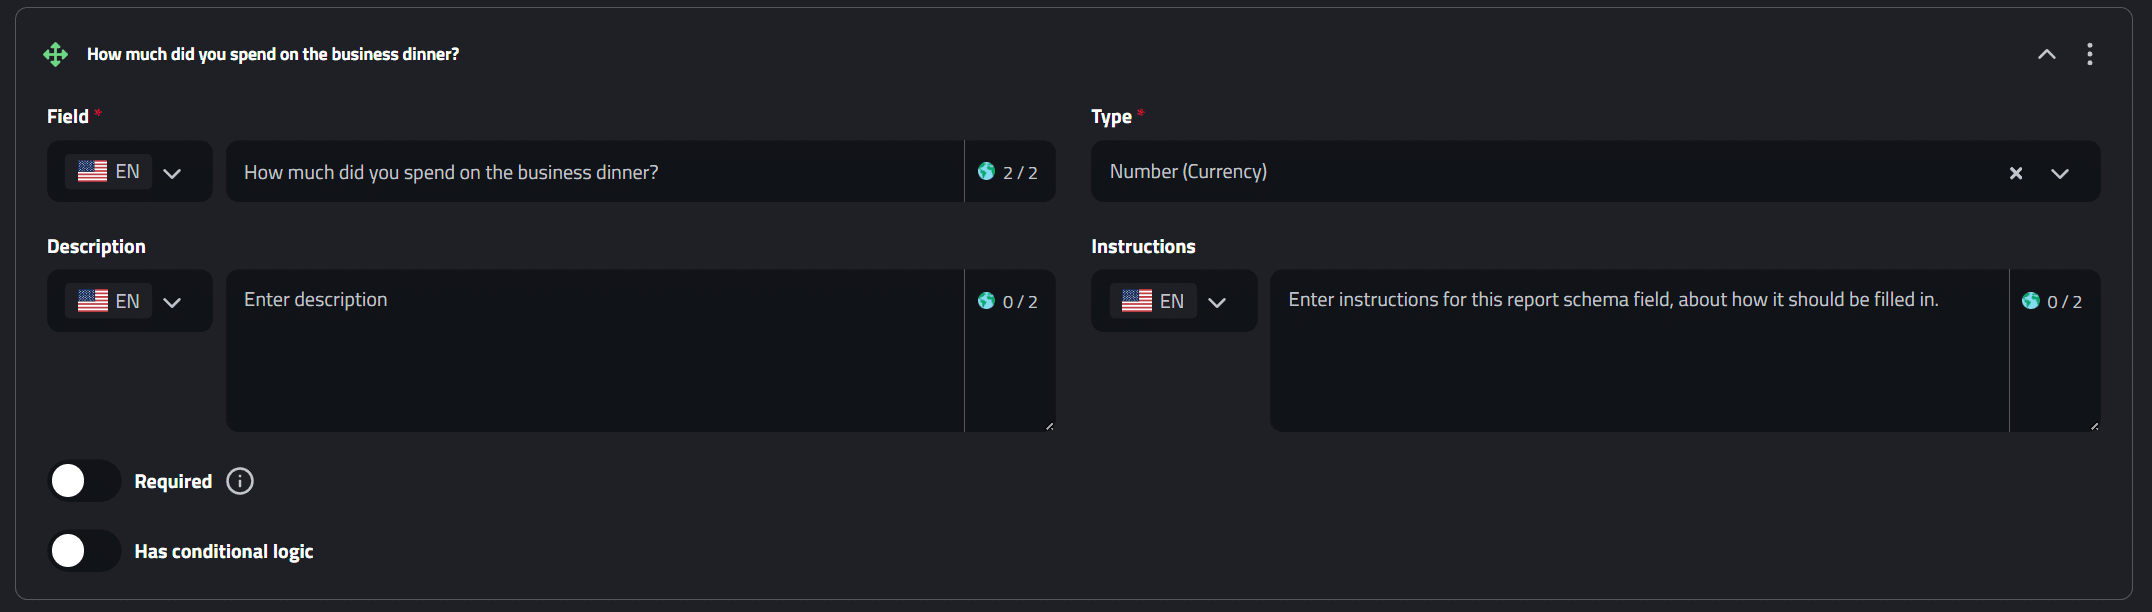
| Number (Currency) | A numeric field formatted as currency. | For expense reports, e.g., “How much did you spend today?”. |
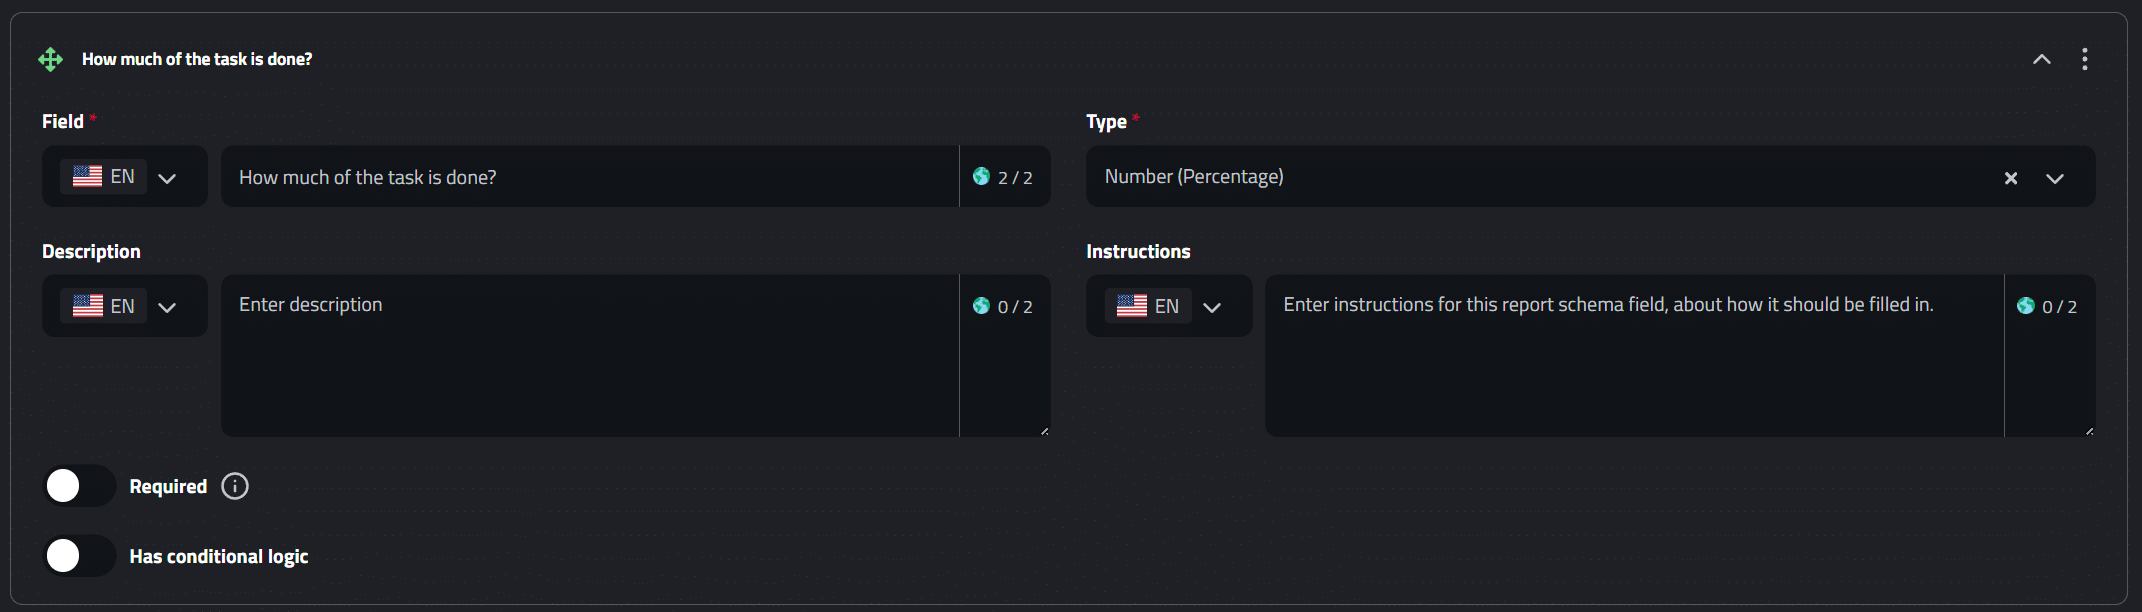
| Number (Percentage) | A numeric field formatted as a percentage. | For progress or completion rates, e.g., “How much of the task is done (in %)”. |
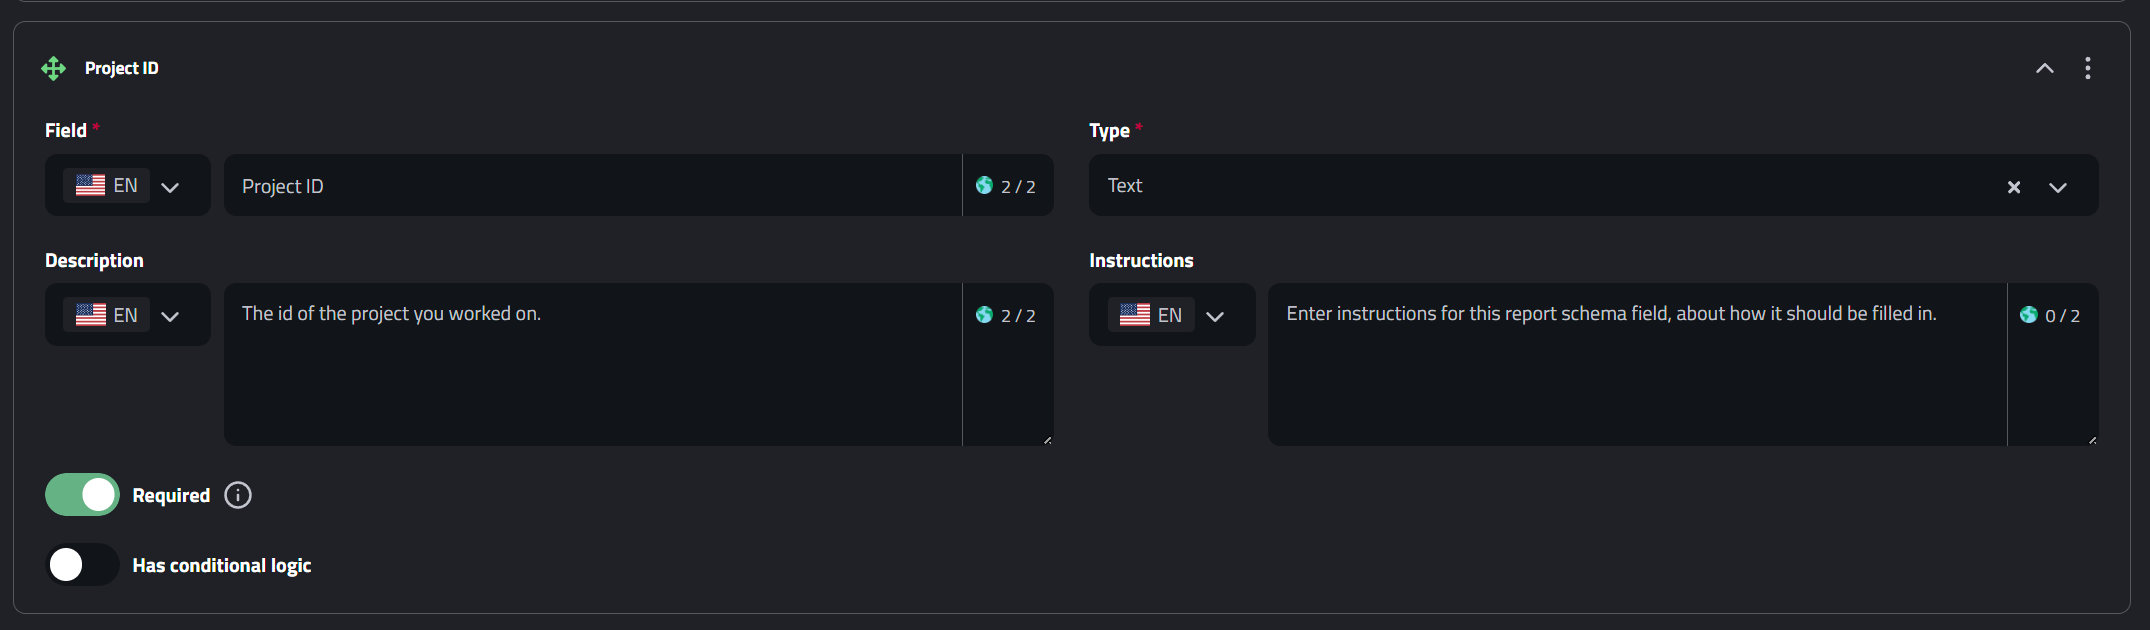
Report Schema Type: Text
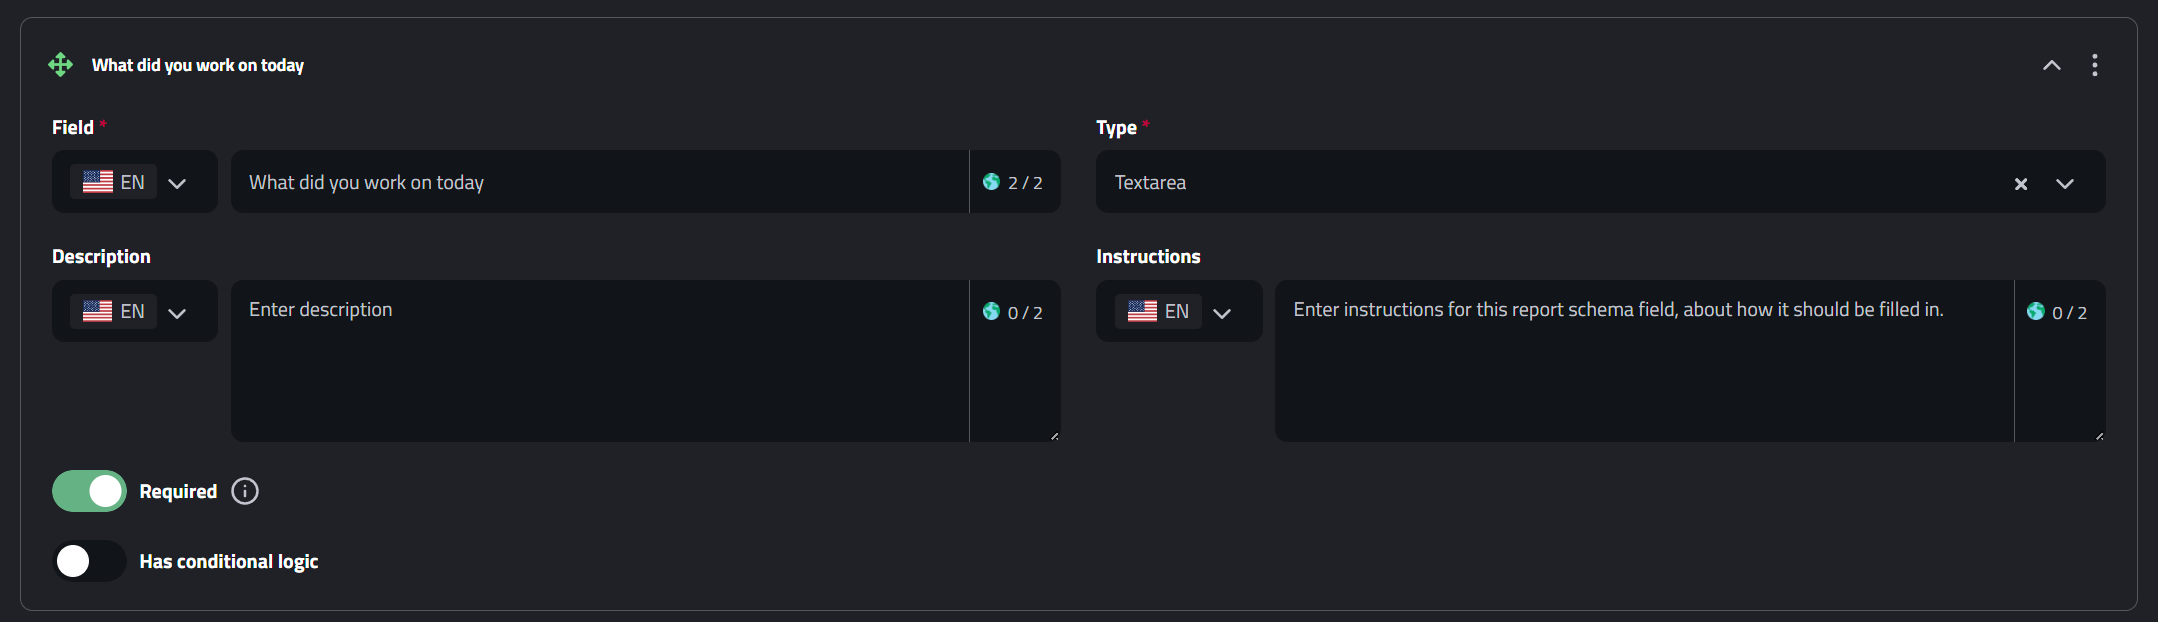
Report Schema Type: Textarea
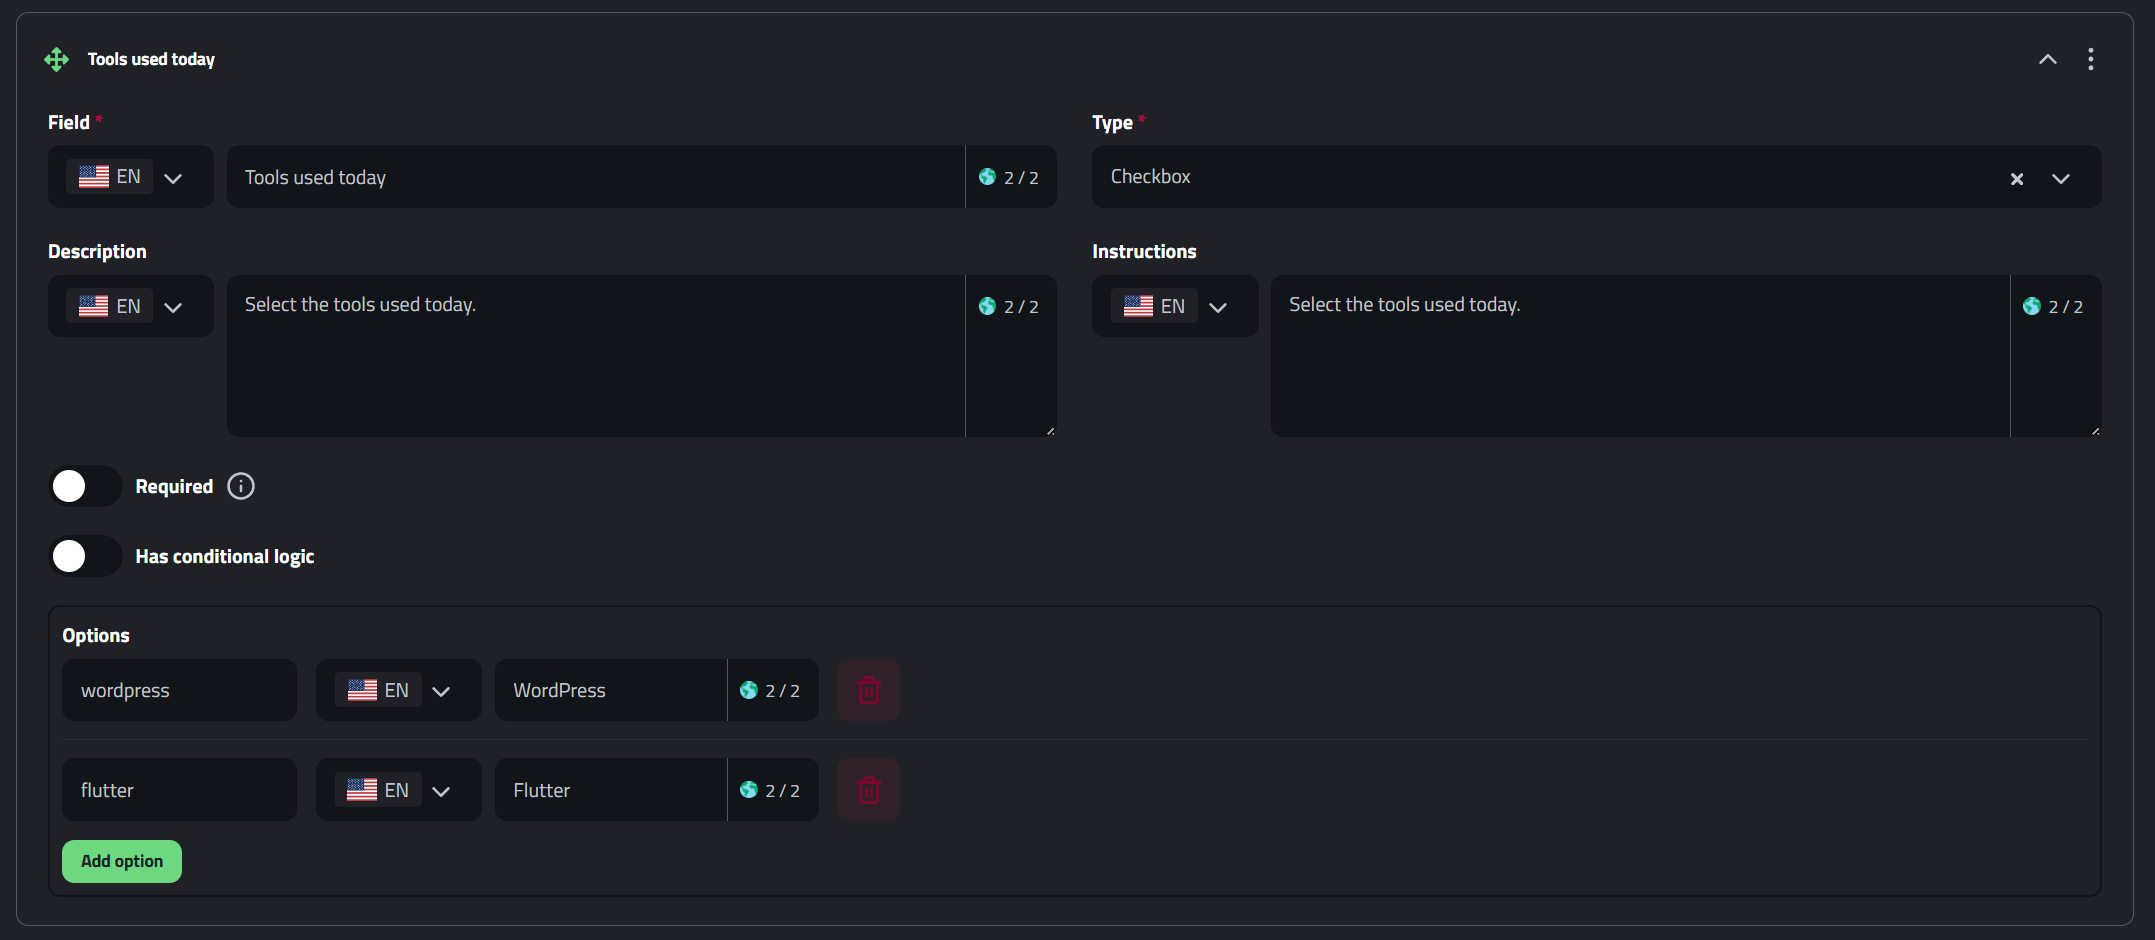
Report Schema Type: Checkbox
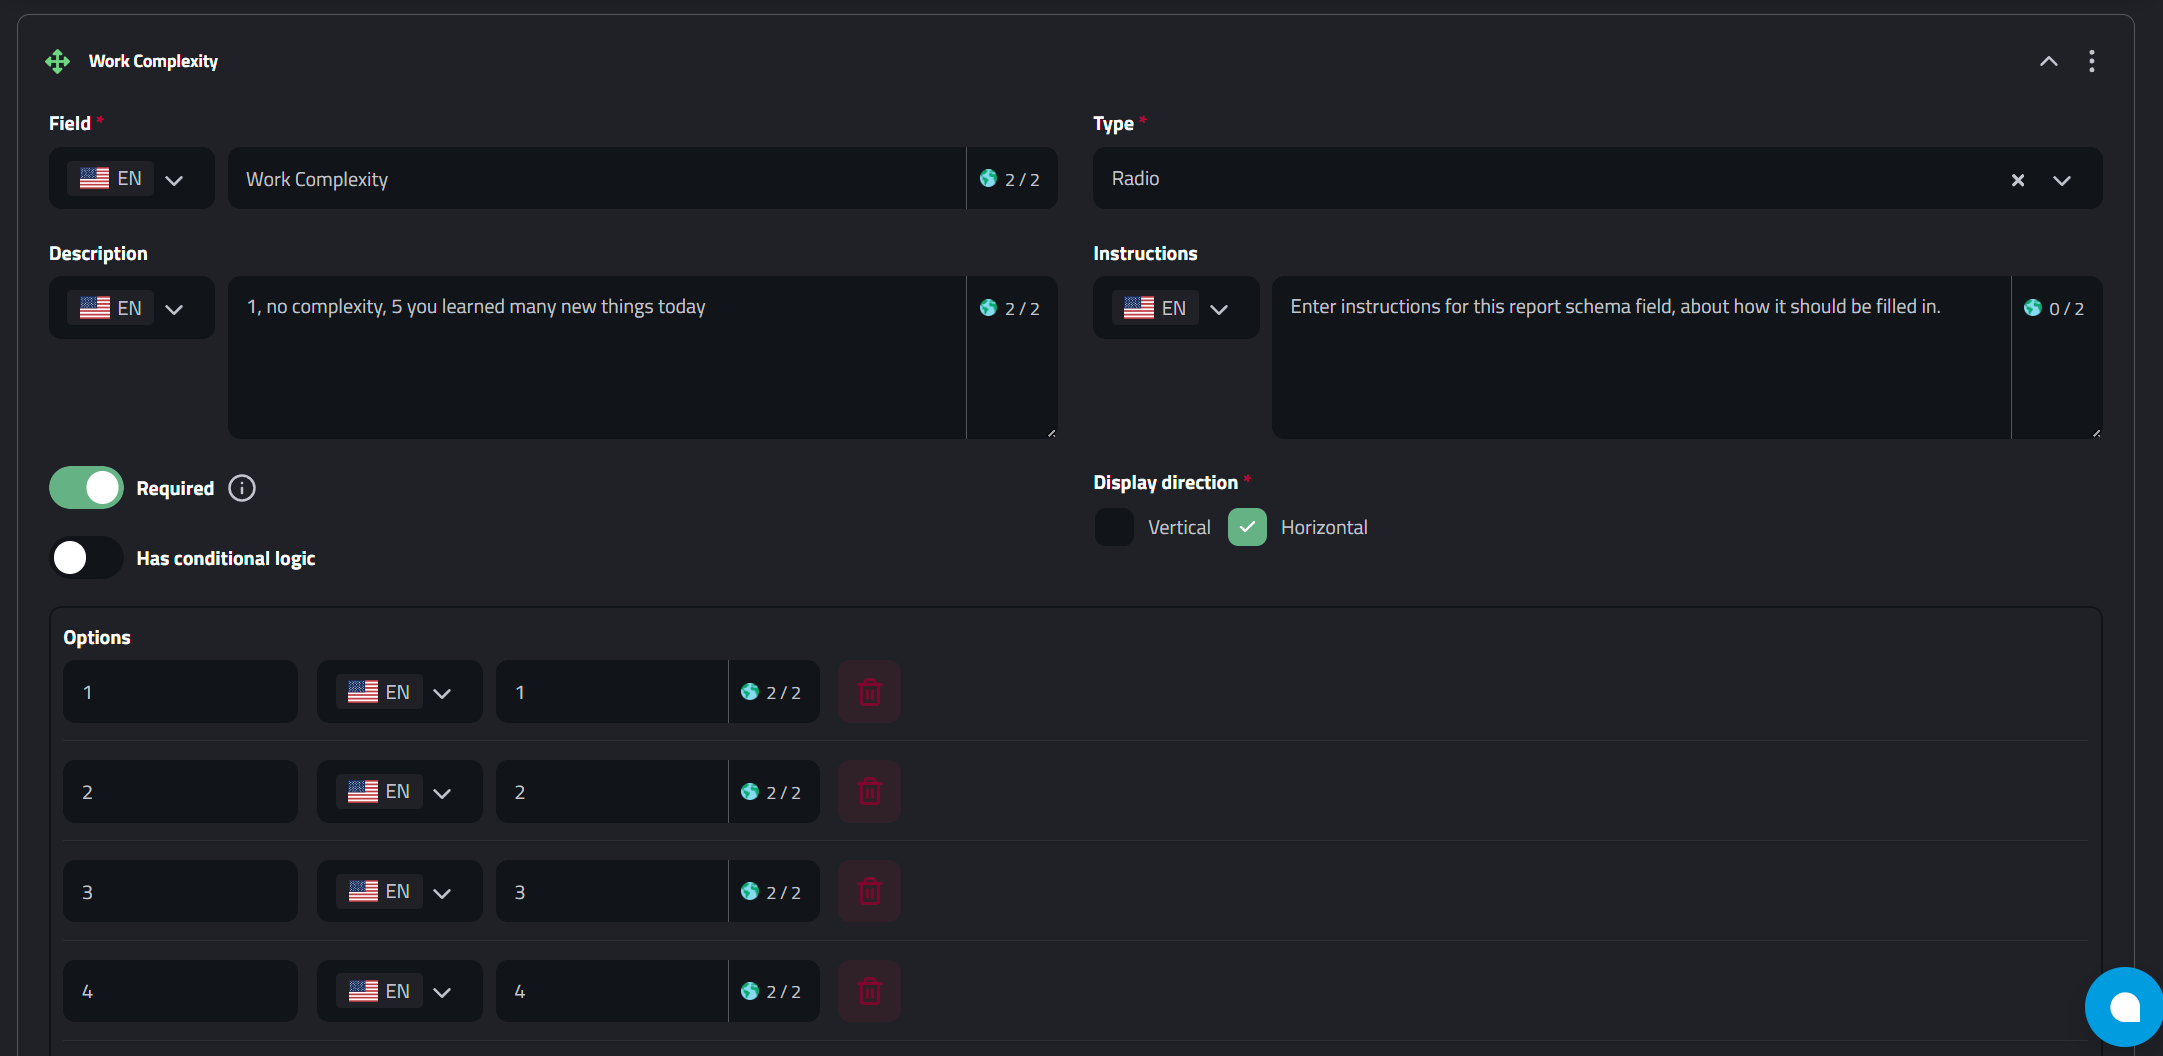
Report Schema Type: Radio
Report Schema Type: Select
Report Schema Type: Editor
Report Schema Type: Date
Report Schema Type: Datetime
Report Schema Type: Number

Report Schema Type: Timesheet

Report Schema Type: Timesheet with Text

Report Schema Type: True/False
Report Schema Type: Organization User
Report Schema Type: Organization User Role
Report Schema Type: Number (Currency)
Report Schema Type: Number (Percentage)
How to Choose the Right Field Type
- Short answers → Text
- Long answers → Textarea
- Single-choice answers → Radio or Select
- Multiple-choice answers → Checkbox
- Formatted text → Editor
- Dates & times → Date or Datetime
- Numeric data → Number, Currency, or Percentage
- Work logs → Timesheet or Timesheet with Text
- Yes/No questions → True/False
- Referencing people/roles → Organization User or Organization User Role